邮件发送是一个非常常见的功能,注册时的身份认证、重要通知发送等都会用到邮件发送。Sun公司提供了JavaMail用来实现邮件发送,但是配置烦琐,Spring 中提供了JavaMailSender用来简化邮件配置,Spring Boot则提供了MailSenderAutoConfiguration对邮件的发送做了进一步简化,本文将介绍Spring Boot如何实现邮件发送功能。
一、环境配置
1、导入依赖
使用Maven在项目中引入spring-boot-starter-mail依赖
1
2
3
4
| <dependency>
<groupId>org.springframework.boot</groupId>
<artifactId>spring-boot-starter-mail</artifactId>
</dependency>
|
2、添加配置信息
引入依赖之后,在application.properties文件中添加以下配置:
1
2
3
4
5
6
7
8
9
10
11
12
13
14
15
16
|
spring.mail.host=smtp.xxx.com
spring.mail.port=xxx
spring.mail.username=xxxxxx@xxx.xx
spring.mail.password=xxxxxxxxxxx
spring.mail.default-encoding=UTF-8
spring.mail.properties.mail.smtp.auth=true
spring.mail.properties.mail.smtp.ssl.enable=true
spring.mail.properties.mail.debug=true
|
备注
- SMTP(Simple Mail Transfer Protocol)定义了邮件客户端软件与SMTP服务器之间,以及SMTP服务器与SMTP服务器之间的通信规则。
- 邮箱的授权码需在账户开启POP3/SMTP服务之后由邮件服务商提供。
二、编写服务类
1、MailService接口
1
2
3
4
5
6
7
8
9
10
11
12
13
14
15
16
17
18
19
20
21
22
23
24
25
26
27
28
29
30
31
32
33
34
35
36
37
38
39
40
41
| package cn.frankfang.service;
import java.io.File;
public interface MailService {
void sendSimpleMall(String to, String subject, String content);
void sendAttachFileMail(String to, String subject, String content, File file);
void sendHtmlMail(String to, String subject, String content);
}
|
2、MailService实现类
1
2
3
4
5
6
7
8
9
10
11
12
13
14
15
16
17
18
19
20
21
22
23
24
25
26
27
28
29
30
31
32
33
34
35
36
37
38
39
40
41
42
43
44
45
46
47
48
49
50
51
52
53
54
55
56
57
58
59
60
61
62
63
64
65
66
67
68
69
70
71
72
73
74
75
76
77
78
79
80
81
82
83
84
85
86
87
88
89
90
| package cn.frankfang.service.impl;
import java.io.File;
import javax.mail.MessagingException;
import javax.mail.internet.MimeMessage;
import org.springframework.beans.factory.annotation.Autowired;
import org.springframework.beans.factory.annotation.Value;
import org.springframework.mail.SimpleMailMessage;
import org.springframework.mail.javamail.JavaMailSender;
import org.springframework.mail.javamail.MimeMessageHelper;
import org.springframework.stereotype.Service;
import cn.frankfang.service.MailService;
@Service
public class MailServiceImpl implements MailService{
@Value("${spring.mail.username}")
private String from;
@Autowired
private JavaMailSender mailSender;
@Override
public void sendSimpleMall(String to, String subject, String content) {
try {
SimpleMailMessage message = new SimpleMailMessage();
message.setFrom(from);
message.setTo(to);
message.setCc(from);
message.setSubject(subject);
message.setText(content);
mailSender.send(message);
}
catch(Exception e) {
e.printStackTrace();
}
}
@Override
public void sendAttachFileMail(String to, String subject, String content, File file) {
try {
MimeMessage message = mailSender.createMimeMessage();
MimeMessageHelper messageHelper = new MimeMessageHelper(message, true);
messageHelper.setFrom(from);
messageHelper.setTo(to);
message.setSubject(subject);
messageHelper.setText(content);
messageHelper.addAttachment(file.getName(), file);
mailSender.send(message);
} catch (MessagingException e) {
e.printStackTrace();
}
}
@Override
public void sendHtmlMail(String to, String subject, String content) {
try {
MimeMessage message = mailSender.createMimeMessage();
MimeMessageHelper messageHelper = new MimeMessageHelper(message, true);
messageHelper.setFrom(from);
messageHelper.setTo(to);
message.setSubject(subject);
messageHelper.setText(content, true);
mailSender.send(message);
} catch (MessagingException e) {
e.printStackTrace();
}
}
}
|
三、发送邮件
下面以发送验证码的功能为例来演示如何发送邮件
1、导入模板引擎
对于格式复杂的邮件,如果采用字符串进行HTML拼接,不但容易出错,而且不易于维护,使用HTML模板可以很好地解决这一问题。使用Thymeleaf构建邮件模板,首先加入Thymeleaf依赖,代码如下:
1
2
3
4
| <dependency>
<groupId>org.springframework.boot</groupId>
<artifactId>spring-boot-starter-thymeleaf</artifactId>
</dependency>
|
2、配置模板引擎
在application.properties文件中添加以下配置:
1
2
|
spring.thymeleaf.cache=false
|
3、编写HTML模板
在项目resource/templates文件夹中添加一个名为mailtemplate.html的文件,并添加以下内容:
1
2
3
4
5
6
7
8
9
10
11
12
13
14
15
16
17
18
19
20
21
22
23
24
25
26
27
28
29
30
31
32
33
34
35
36
37
38
39
| <!DOCTYPE html>
<html xmlns:th="http://www.thymeleaf.org">
<head>
<title>邮箱验证</title>
<meta charset="utf-8">
</head>
<body>
<div style="padding: 10px; background-color: #393D49;">
<h2 style="color: #FFFFFF; margin: 0px;">Frank's Blog</h2>
</div>
<div style="padding-top: 10px; padding-bottom: 10px;">
<div style="background-color: snow; padding: 20px;">
<div>
<h3>尊敬的用户:您好!</h3>
<p>说明:您现在正在进行敏感操作,为了确保您的账户安全,我们将通过邮件对您进行身份验证。</p>
<p th:text="${message}"></p>
<div>
<h4>本次的验证码为:</h4>
<div style="background-color: #EBEEF5; padding: 10px;">
<h3 th:text="${code}"></h3>
</div>
<h4>有效期为5分钟</h4>
</div>
<p style="margin-top: 15px;">发件人:Frank's Blog 安全服务</p>
</div>
</div>
</div>
<div style="padding: 10px; text-align: center; background-color: #2F4056;">
<p style="margin: 0px; color: #FFFFFF;">Copyright © 2020 <a href="https://www.frankfang.cn/" style="color: #FFFFFF;">www.frankfang.cn</a> All Rights Reserved.</p>
</div>
</body>
</html>
|
4、调用邮件服务
1
2
3
4
5
6
7
8
9
10
11
12
13
14
15
16
17
18
19
20
21
22
23
24
25
26
27
28
29
30
31
32
33
| @RestController
public class VerificationController {
@Autowired
private MailService mailService;
@Autowired
private RedisService redisService;
@Autowired
private TemplateEngine templateEngine;
@GetMapping("/verify/{username}")
public Object sendVerificationCode(@PathVariable("username") String key) {
String to = "xxxxxxxx@xx.com";
String message = "详情:您正在尝试进行登录操作,若非是您本人的行为,请忽略!";
String code = MailCodeUtils.getCode();
redisService.set(key, code);
redisService.expire(key, 60 * 5);
Context context = new Context();
context.setVariable("message", message);
context.setVariable("code", code);
String mail = templateEngine.process("mailtemplate.html", context);
mailService.sendHtmlMail(to, "邮箱验证码", mail);
return new JsonResponse(HttpServletResponse.SC_OK, "验证码发送成功!");
}
}
|
备注
- RedisService为Redis服务类接口
- JsonResponse为封装的返回数据类
5、测试
启动服务器并向服务端发送请求,结果如下:
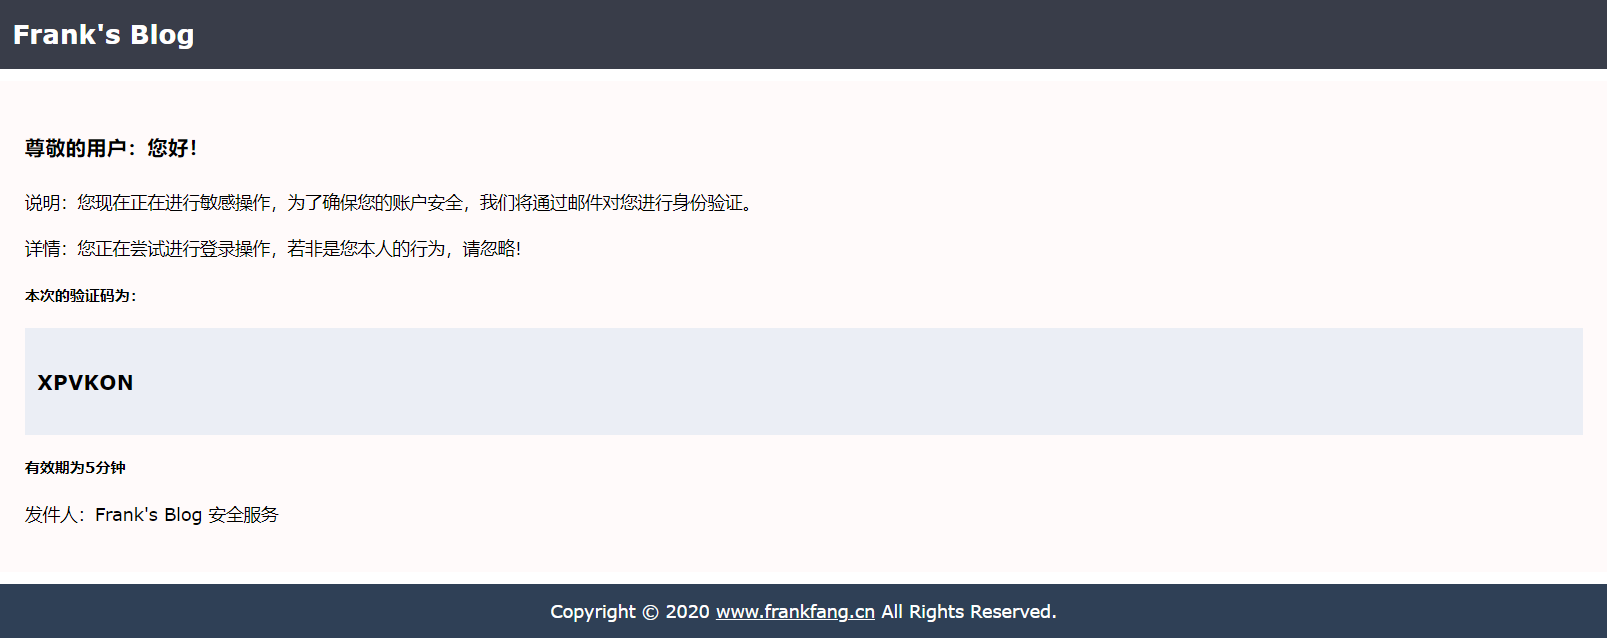
当收件人邮箱收到以上内容的邮件时即测试成功。