在之前的一篇文章《基于XML配置的方式实现Spring中的AOP》中我们已经介绍了如何基于XML配置文件的方式来配置Spring中的AOP,接下来本文将继续使用之前的案例来介绍如何使用注解的方式来配置Spring中的AOP。
一、准备工作
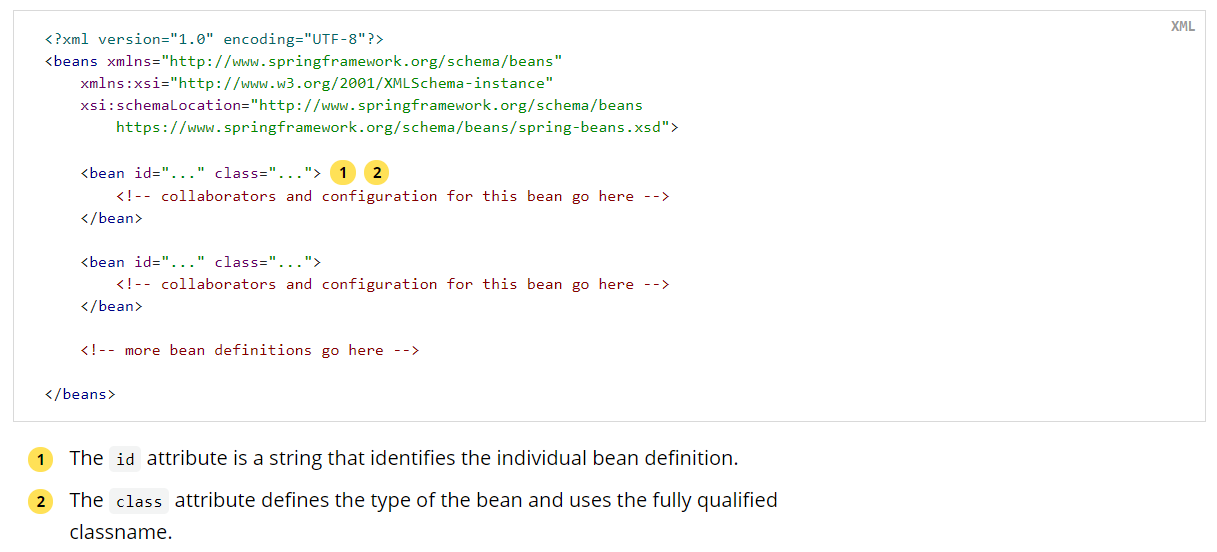
1、导入依赖
基于注解的配置与基于XML的配置相同,都需要额外导入以下依赖:
1
2
3
4
5
| <dependency>
<groupId>org.aspectj</groupId>
<artifactId>aspectjweaver</artifactId>
<version>1.9.5</version>
</dependency>
|
2、配置容器
配置内容与《AOP概述及Spring中的AOP》一文中的案例配置基本相同,这里不再赘述。
二、基于注解的配置步骤
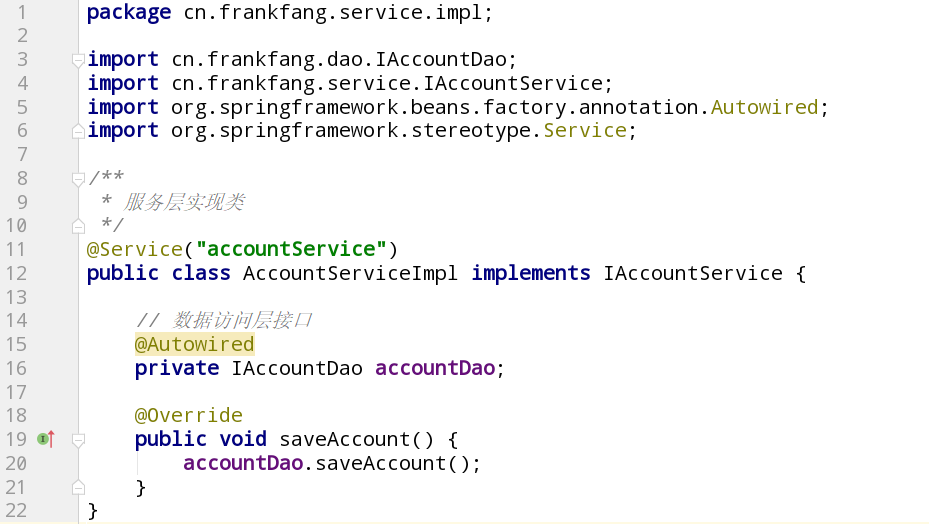
1、将通知类注入到容器中
将通知类TransactionManager添加到Spring容器中:
1
2
3
4
5
6
7
8
9
10
11
12
13
14
15
16
17
18
19
20
21
22
23
24
25
26
27
28
29
30
31
32
33
34
35
36
37
38
39
40
41
42
43
44
45
46
47
48
49
50
51
52
53
54
55
56
57
58
59
60
61
62
63
64
65
| package cn.frankfang.utils;
import org.springframework.beans.factory.annotation.Autowired;
import org.springframework.stereotype.Component;
@Component("transactionManager")
public class TransactionManager {
private ConnectionUtils connectionUtils;
@Autowired
public void setConnectionUtils(ConnectionUtils connectionUtils) {
this.connectionUtils = connectionUtils;
}
public void beginTransaction(){
try {
System.out.println("开启事务...");
connectionUtils.getThreadConnection().setAutoCommit(false);
}catch (Exception e){
e.printStackTrace();
}
}
public void commit(){
try {
System.out.println("提交事务...");
connectionUtils.getThreadConnection().commit();
}catch (Exception e){
e.printStackTrace();
}
}
public void rollback(){
try {
System.out.println("回滚事务...");
connectionUtils.getThreadConnection().rollback();
}catch (Exception e){
e.printStackTrace();
}
}
public void release(){
try {
System.out.println("释放连接...");
connectionUtils.getThreadConnection().close();
connectionUtils.removeConnection();
}catch (Exception e){
e.printStackTrace();
}
}
}
|
2、开启AOP支持
在SpringConfiguration配置类中加上@EnableAspectJAutoProxy注解即表示开启Spring AOP支持
1
2
3
4
5
6
7
8
9
10
11
12
13
14
15
16
17
18
19
20
21
22
23
24
25
26
27
| package cn.frankfang.config;
import cn.frankfang.dao.impl.AccountDaoImpl;
import cn.frankfang.service.IAccountService;
import cn.frankfang.service.impl.AccountServiceImpl;
import cn.frankfang.utils.TransactionManager;
import com.mchange.v2.c3p0.ComboPooledDataSource;
import org.apache.commons.dbutils.QueryRunner;
import org.springframework.beans.factory.annotation.Qualifier;
import org.springframework.beans.factory.annotation.Value;
import org.springframework.context.annotation.*;
import javax.sql.DataSource;
import java.lang.reflect.InvocationHandler;
import java.lang.reflect.Method;
import java.lang.reflect.Proxy;
@Configuration
@ComponentScan("cn.frankfang")
@PropertySource("classpath:application.properties")
@EnableAspectJAutoProxy
public class SpringConfiguration {
}
|
注:如果配置文件是XML格式,可以配置中添加以下内容:
1
| <aop:aspectj-autoproxy/>
|
同样表示开启注解配置。
若需获取更多关于开启AOP支持的内容,请参阅:Enabling @AspectJ Support。
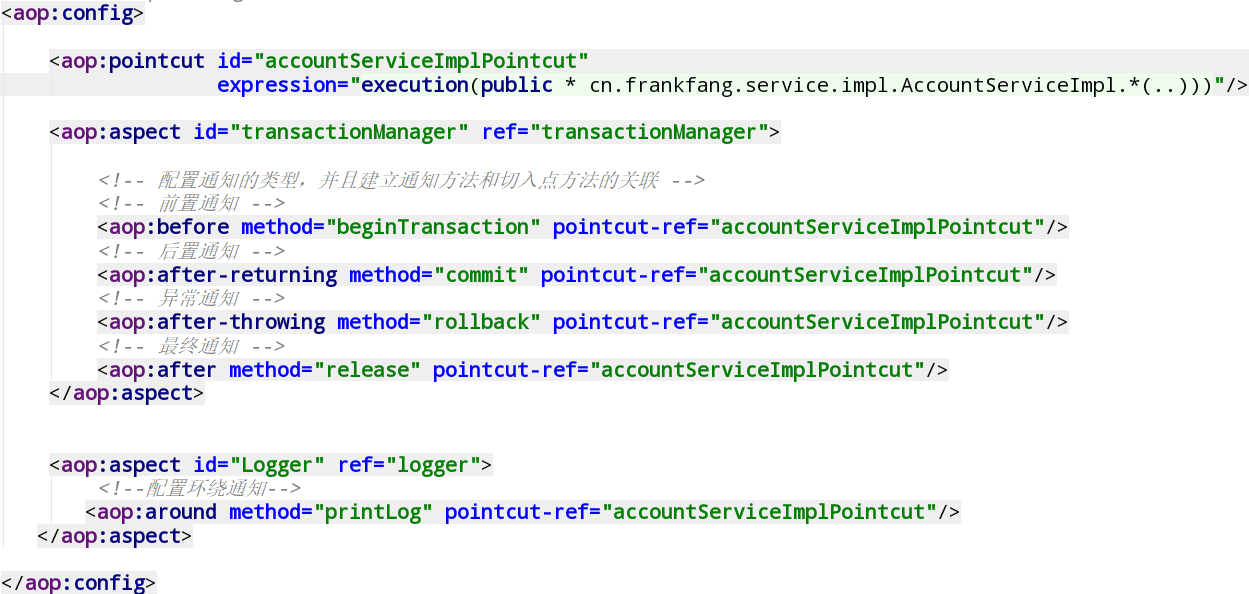
3、配置切面
在通知类上加上一个@Aspect注解即可
1
2
3
4
5
6
7
8
9
10
11
| package cn.frankfang.utils;
import org.aspectj.lang.annotation.*;
import org.springframework.beans.factory.annotation.Autowired;
import org.springframework.stereotype.Component;
@Component("transactionManager")
@Aspect
public class TransactionManager {
}
|
若需获取更多关于配置切面的内容,请参阅:Declaring an Aspect。
4、配置通知类型
在对应通知方法上加上相应的注解
1
2
3
4
5
6
7
8
9
10
11
12
13
14
15
16
17
18
19
20
21
22
23
24
25
26
27
28
29
30
31
32
33
34
35
36
37
38
39
40
41
42
43
44
45
46
47
48
49
50
51
52
53
54
55
56
57
58
59
60
61
62
63
64
65
66
67
68
69
70
71
72
73
74
75
| package cn.frankfang.utils;
import org.aspectj.lang.annotation.*;
import org.springframework.beans.factory.annotation.Autowired;
import org.springframework.stereotype.Component;
@Component("transactionManager")
@Aspect
public class TransactionManager {
private ConnectionUtils connectionUtils;
@Pointcut("execution(public * cn.frankfang.service.impl.AccountServiceImpl.*(..))")
private void pointCutExp() {}
@Autowired
public void setConnectionUtils(ConnectionUtils connectionUtils) {
this.connectionUtils = connectionUtils;
}
@Before("pointCutExp()")
public void beginTransaction(){
try {
System.out.println("开启事务...");
connectionUtils.getThreadConnection().setAutoCommit(false);
}catch (Exception e){
e.printStackTrace();
}
}
@AfterReturning("pointCutExp()")
public void commit(){
try {
System.out.println("提交事务...");
connectionUtils.getThreadConnection().commit();
}catch (Exception e){
e.printStackTrace();
}
}
@AfterThrowing("pointCutExp()")
public void rollback(){
try {
System.out.println("回滚事务...");
connectionUtils.getThreadConnection().rollback();
}catch (Exception e){
e.printStackTrace();
}
}
@After("pointCutExp()")
public void release(){
try {
System.out.println("释放连接...");
connectionUtils.getThreadConnection().close();
connectionUtils.removeConnection();
}catch (Exception e){
e.printStackTrace();
}
}
}
|
下面将介绍一下上面代码中使用的相关注解:
@Before:用于标注前置通知,需要传入切入点表达式@AfterReturning:用于标注后置通知,需要传入切入点表达式@AfterThrowing:用于标注异常通知,需要传入切入点表达式@After:用于标注最终通知,需要传入切入点表达式
此外,还使用了@Pointcut注解,注意这里的写法:
1
2
| @Pointcut("execution(public * cn.frankfang.service.impl.AccountServiceImpl.*(..))")
private void pointCutExp() {}
|
该注解需要传入切入点表达式的值,关于切入点表达式在之前介绍基于XML配置方式实现Spring的AOP中已经做过详细介绍,这里不再赘述。
此外,该注解需要作用于一个成员方法上,该方法将作为一个切入点标志,之后在传入切入点表达式的时候就可以传入该方法的名称(注意要加上())。
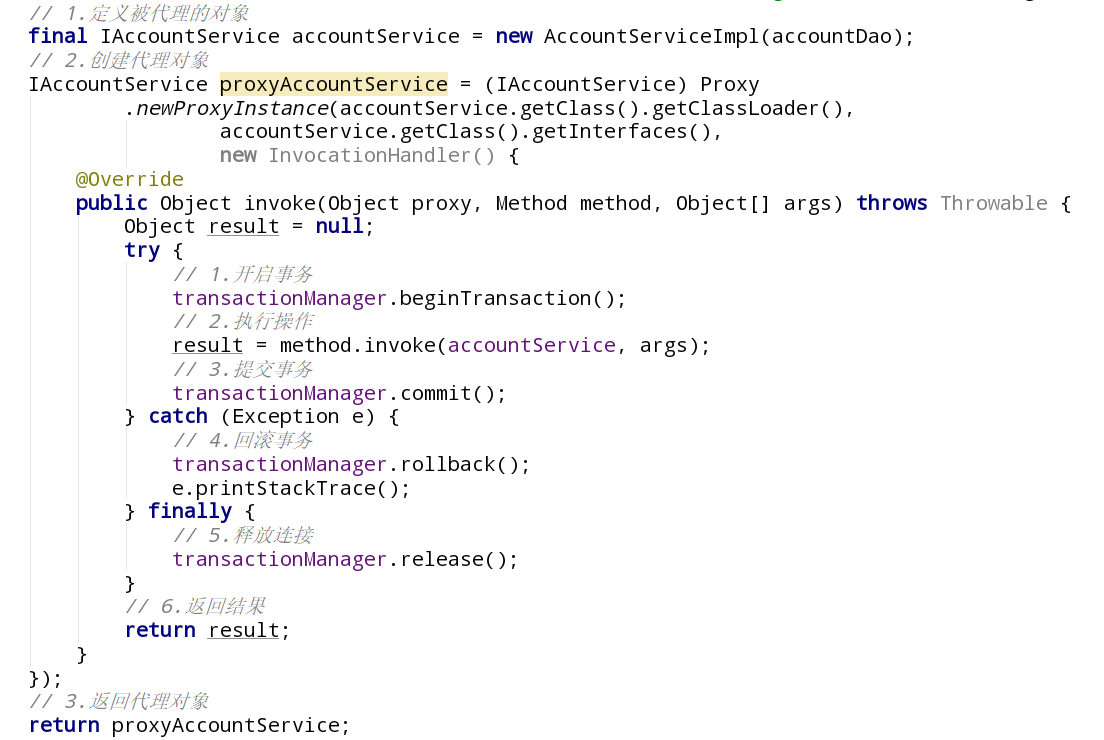
之后运行项目,却出现了以下结果:
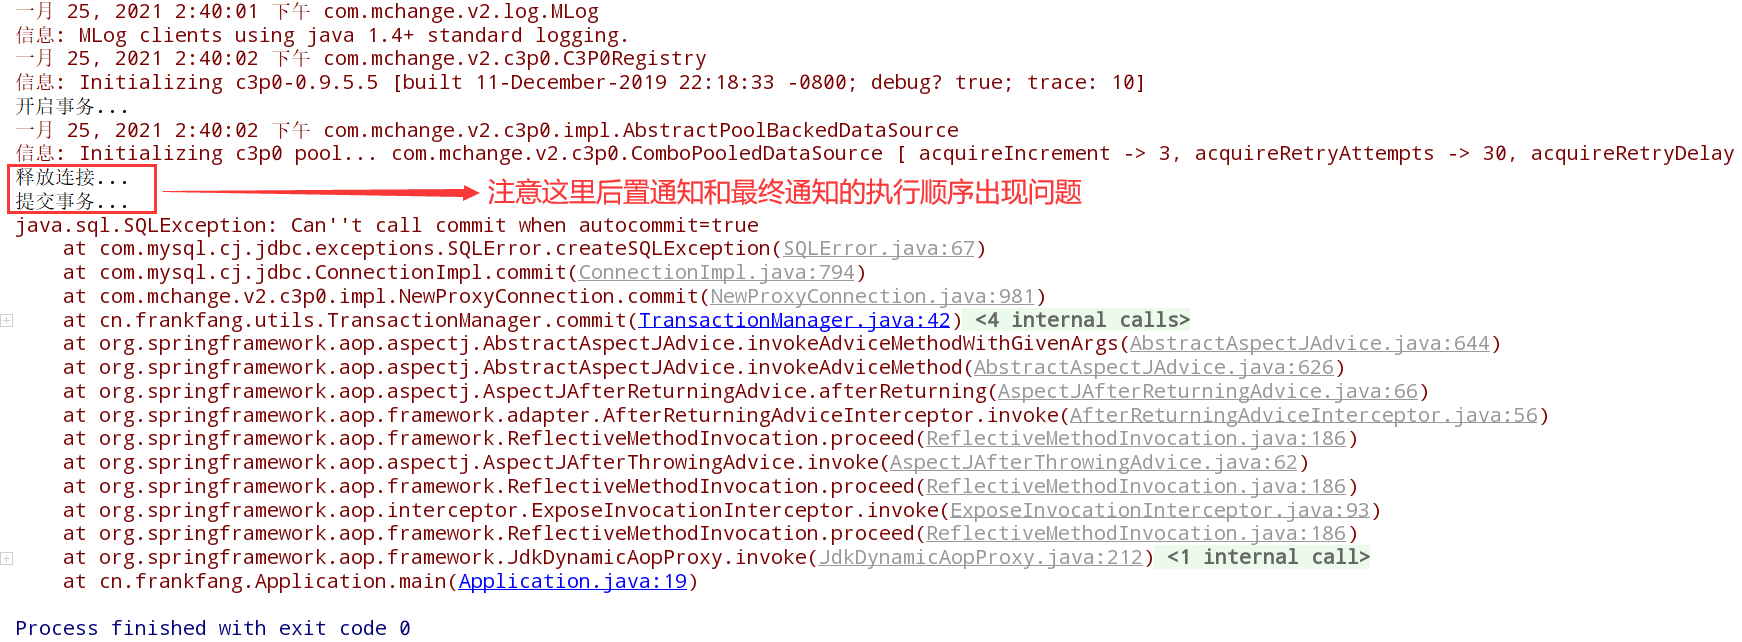
通过控制台输出的内容我们可以发现后置通知和最终通知的顺序出现问题。在排除业务的问题之后,我们尝试将@AfterReturning和@After注解的位置进行对调,即将@AfterReturning当作最终通知,而@After当作后置通知,之后再次运行项目,发现执行顺序竟然正常了,运行结果如下:

因此推测可能是Spring框架这里出现了Bug,接下来我们来测试一下环绕通知的注解@Around是否有问题。
我们添加一个日志通知类Logger,代码如下:
1
2
3
4
5
6
7
8
9
10
11
12
13
14
15
16
17
18
19
20
21
22
23
24
25
26
27
28
29
30
31
32
33
34
35
36
37
38
39
40
41
| package cn.frankfang.utils;
import org.aspectj.lang.ProceedingJoinPoint;
import org.aspectj.lang.annotation.Around;
import org.aspectj.lang.annotation.Aspect;
import org.aspectj.lang.annotation.Pointcut;
import org.springframework.stereotype.Component;
@Component("logger")
@Aspect
public class Logger {
@Pointcut("execution(public * cn.frankfang.service.impl.AccountServiceImpl.*(..))")
private void pointCutExp() {}
@Around("pointCutExp()")
public Object printLog(ProceedingJoinPoint joinPoint) {
Object result = null;
try {
System.out.println("Logger类中的printLog方法开始记录日志...前置通知");
Object[] args = joinPoint.getArgs();
result = joinPoint.proceed(args);
System.out.println("Logger类中的printLog方法开始记录日志...后置通知");
} catch (Throwable throwable) {
System.out.println("Logger类中的printLog方法开始记录日志...异常通知");
throw new RuntimeException(throwable);
} finally {
System.out.println("Logger类中的printLog方法开始记录日志...最终通知");
}
return result;
}
}
|
之后暂时将TransactionManager通知关闭,再次运行程序,结果如下:

这次通知执行的顺序是正常的。
若需获取更多关于配置通知类型的内容,请参阅:Declaring Advice。
三、总结
Spring支持使用注解的方式来配置AOP,但在一些版本会出现通知执行顺序异常的情况,因此如果要采用注解进行配置的话,推荐使用环绕通知的方式。